Configure Wi-Fi
To configure Wi-Fi settings and create a priority connection list:
-
Select Settings
 on the bottom left of the Home screen. The Settings Menu will open.
 - Select Networking
 on the Settings menu. The Network Settings window will open.
 - Select the Enable WiFi checkbox. A list of available Wi-Fi connections will appear.
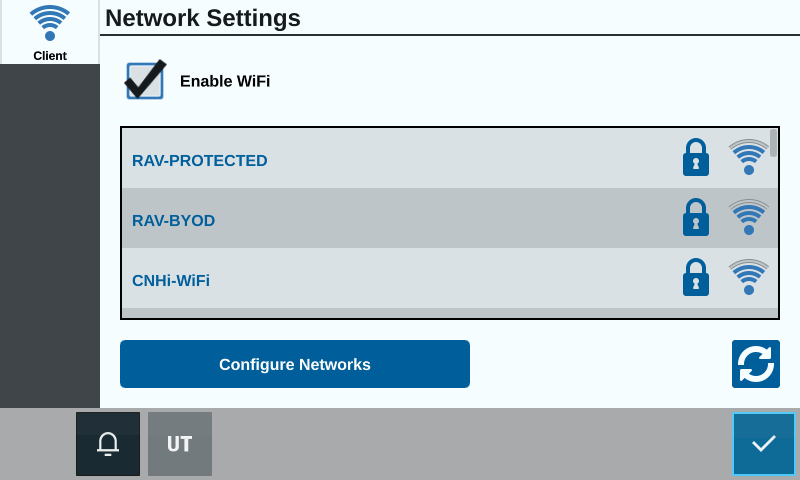
- Select the desired Wi-Fi Connection. If needed, select Refresh
 to update the Wi-Fi connection list.
 - If needed, enter the Wi-Fi Password to connect to that network.
- Select Connect. The CRX+ will attempt to connect to that Wi-Fi hotspot. If an invalid password is entered, a notification will open saying the password was invalid.
Note: If desired for future Wi-Fi connections to this hotspot, select Connect Automatically. This will allow the CRX+ to connect to that hotspot when it is in range.
- After a successful connection, the hotspot information will have a blue background.
- Repeat the process for all desired connections.
Note: Wi-Fi priority is created by the CRX+ connecting to the Wi-Fi connections that do not have data or speed restrictions. Unrestricted connections will take priority over restricted networks.
- Select Accept
 to save the displayed settings and return to the Settings menu.
Create Manual Network
- Select Settings on the bottom left of the Home screen. The Settings Menu will open.
- Select Networking on the Settings menu. The Network Settings window will open.
- Select Configure Networks at the bottom of the Network Settings screen.
- Select Add
 .
. - Enter a name for the network in the SSID
 Service Set IDentifier field.
 - Select the desired security level. If a secured network is selected, enter the desired Password.
- If desired, select Data Restriction to limit the amount of data that is transferred via the network.
- If desired, select Auto-Connect to allow devices to automatically connect to this network.
- Select Accept to save the displayed settings and return to the Settings menu.
Last Revised: Mar 2025