Configure the AG-372 with AgRemote
This procedure is only necessary when using a Trimble AG-372 receiver with the Raven auto-steering system.
Note: Connect AgRemote to Port B on the AG-372 receiver.
GNSS Configuration
- Press the Right button until "Configuration" displays on the screen.
- Press the Down button to select "Configuration."
- Press the Right button until "GPS Config" displays.
- Press the Down button until "Position Rate" displays.
- Press the Right button to set the "Position Rate" to 10 Hz.
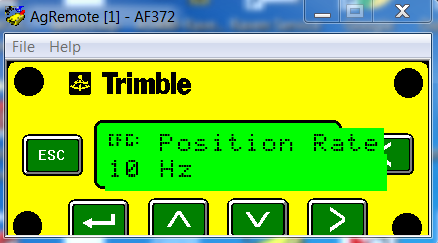
- Press the Enter button to save the settings.
Radio Mode Configuration
- Press the Right button until "Configuration" displays on the screen.
- Press the Down button to select "Configuration."
- Press the Right button until "RTK
 Real-time Kinematic Config" displays.
 - Press the Down button to select “RTK Config” displays.
- Press the Down button until “Delivery” displays.
- Select the Right button to set “Delivery” to Trimble CMRRadio.
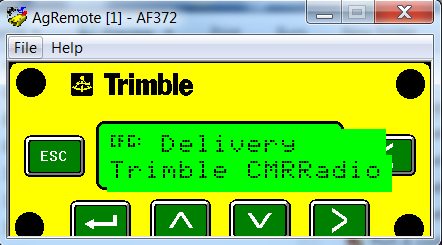
- Press the Enter button to save the settings.
Port A Configuration
- Press the Right button until "Configuration" displays on the screen.
- Press the Down button to select "Configuration."
- Press the Right button until “Port A Config” displays.
- Press the Down button to select “Port A Config.”
- Verify the Input (I) messages are set to None and the baud rate is set to 115k.
- Verify the Output (O) messages are set to 8N1 and that the NEMA and baud rates are set to 115k.
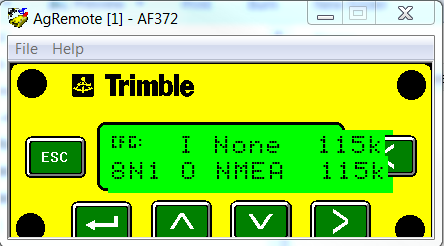
- Press the Enter button to save the settings.
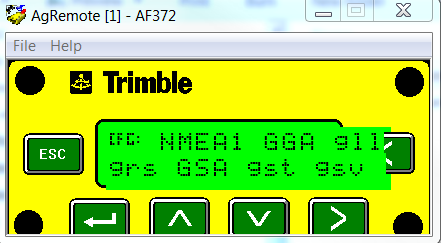
- Press the Down button until “NEMA1” displays.
- Verify GGA and GSA are capitalized so they are on.
- Press the Enter button to save the settings.
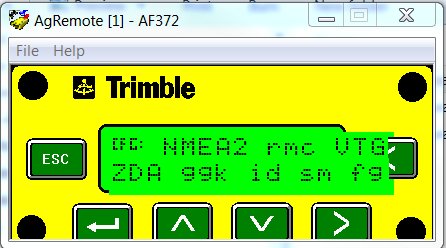
- Press the Down button until “NEMA2” displays.
- Verify that VTG and ZDA are capitalized so they are turned on.
- Press the Down button to continue configuring Port A.
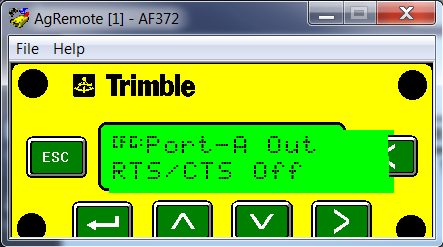
- Press the Down button until “CFG: Port A Out RTS_CTS” displays.
- Verify “CFG: Port A Out RTS_CTS” is off.
- Press the Enter button to save the settings.
- Press the Down button to continue configuring Port A.
- Press the Enter button to save the settings.
- Press the Down button until “NMEA National Marine Electronics Association” out displays.
- Verify that “NEMA” out and TSIP out are set to ASAP.

- Press the Enter button to save the settings.
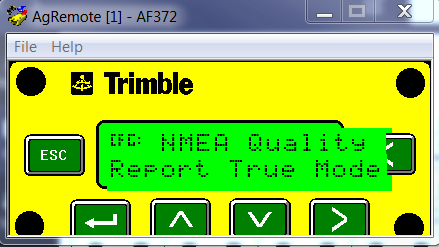
- Press the Down button until “CFG: NEMA QUALITY” displays.
- Verify the setting is Report True Mode.
- Press the Enter button to save the settings.
Port B Configuration
- Press the Right button until “Configuration” displays.
- Press the Down button to select “Configuration”.
- Press the Right button until “Port B Config” displays.
- Press the Down button to select Port B Config.
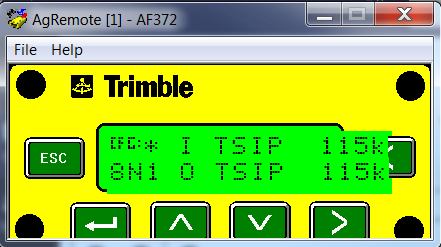
- Verify the Input (I) messages are set to TSIP and the baud rate is set to 115K.
- Verify the Output (O) messages are set to 8N1 and the TSIP and baud rate are set to 115K.
- Press the Enter button to save the settings.
Last Revised: Oct 2024