Auto Turn
Note: Auto Turn is an additional feature that must be unlocked to be accessed. Refer to Feature Unlocks for more information on unlocking features.
Configure Auto Turn
To configure the Auto Turn feature in CRX+:
-
Select Settings
 on the bottom left of the Home screen. The Settings Menu will open.
 -
Select Auto Turn
 on the settings menu. The Auto Turn Settings window will open.
Note: The Auto Turn Settings window can also be accessed in a job by pressing and holding the Auto Turn Widget
 on the run screen.
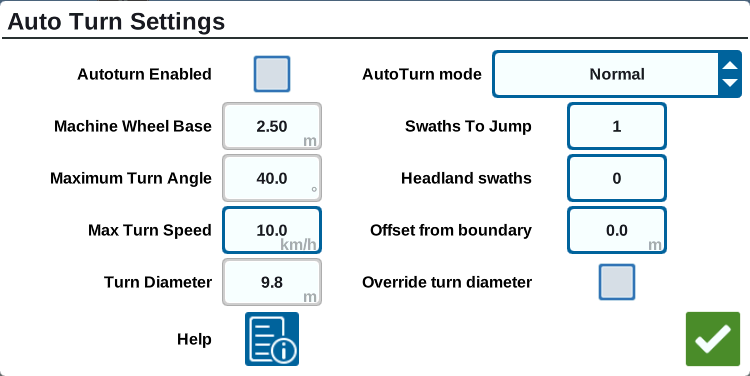
-
Configure the available settings to the operator's preference:
 Autoturn Enabled
Select this option to enable the Auto Turn feature. The Auto Turn widget will extend to include directional arrows on the run screen.
Note: Refer to Widgets for more information on widgets on the run screen.
Machine Wheel Base
Input the distance between the front and rear axles of the machine.
Note: This option cannot be edited if an RS1™ is connected to the CRX+ device. This value can be changed in the RS1™ configuration.
Maximum Turn Angle
Input the maximum angle the wheels are allowed to turn.
Note: This option cannot be edited if an RS1™ is connected to the CRX+ device. This value can be changed in the RS1™ configuration.
Max Turn Speed
Input the maximum speed the tractor is allowed to drive when turning automatically.
Note: A higher maximum speed will also cause a larger diameter of the turn.
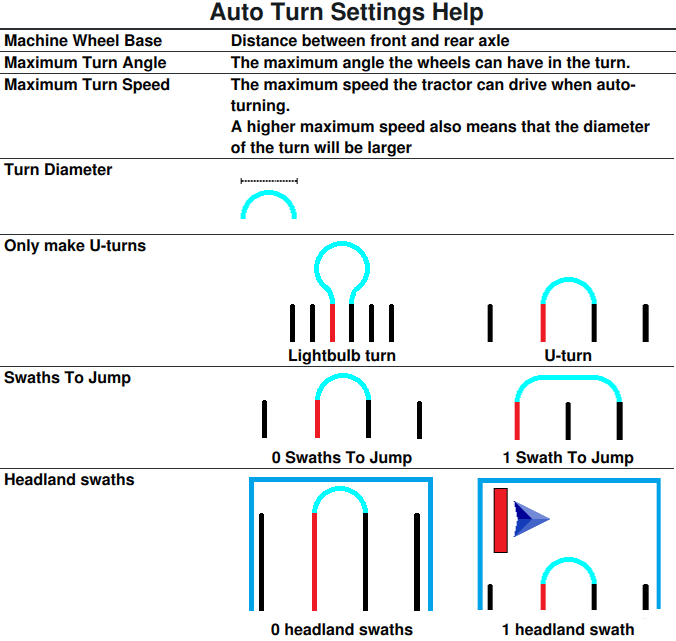
Turn Diameter
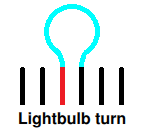
This option is not typically set by the operator. This will display the calculated turn diameter that was determined by the wheel base, max turn angle, and maximum speed. If the distance between swaths is less than the turn diameter, a "lightbulb" turn will commence. The calculated value is the minimum value allowed. Select the Override Turn Diameter checkbox to allow the Turn Diameter to be overridden with a larger value.
 Override Turn Diameter
Select this checkbox to allow the Turn Diameter to be overridden with a larger value.
Autoturn Mode
Use this drop-down to select Normal mode to allow for "lightbulb" turns, or select U-turn mode to only allow u-turns.
 Swaths to Jump
Input the number of swaths desired to be skipped at each turn. If set to 0, Auto Turn will not skip any swaths.
Headland Swaths
Input the number of desired headland passes at the top of the field. When set to 1, the turn will be made in such a way that the implement will not enter this area.
Note: For example, if the implement is 10 meters, then the Auto Turn line will be at 15 meters from the boundary (1 headland pass plus half implement width). This can be increased or decreased using the offset from boundary.
Offset From Boundary
Input the desired offset to add to the total distance from boundary. The default distance from the boundary will be determined by the number of swaths multiplied by the width of the implement and added to half of the width of the implement. Set the offset from boundary to add to this distance.
Help
Select this option to view descriptions and visual representations of several available options.
Operate the Auto Turn Widget
Once activated, the Auto Turn widget will extend directional arrows for right and left:

Selected (Blue) Side
-
The selected (blue) arrow indicates the direction of the upcoming turn.
-
Pressing the selected arrow will increase the number of skipped swaths by one for the upcoming turn to a maximum of four skipped swaths.
Unselected (Gray) Side
-
The unselected (gray) arrow indicates the opposite direction of the upcoming turn.
-
Pressing the unselected arrow will change the direction of the upcoming turn but will not change the number of swaths to skip.
Middle Section
-
The middle portion of the widget displays the current machine speed and the distance to the turn.
Note: If the machine exceeds the configured speed, the speed in the widget will turn red.
-
Pressing and holding on the middle portion of the widget will open the Auto Turn Settings page.
Last Revised: Mar 2025