Run Screen Overview
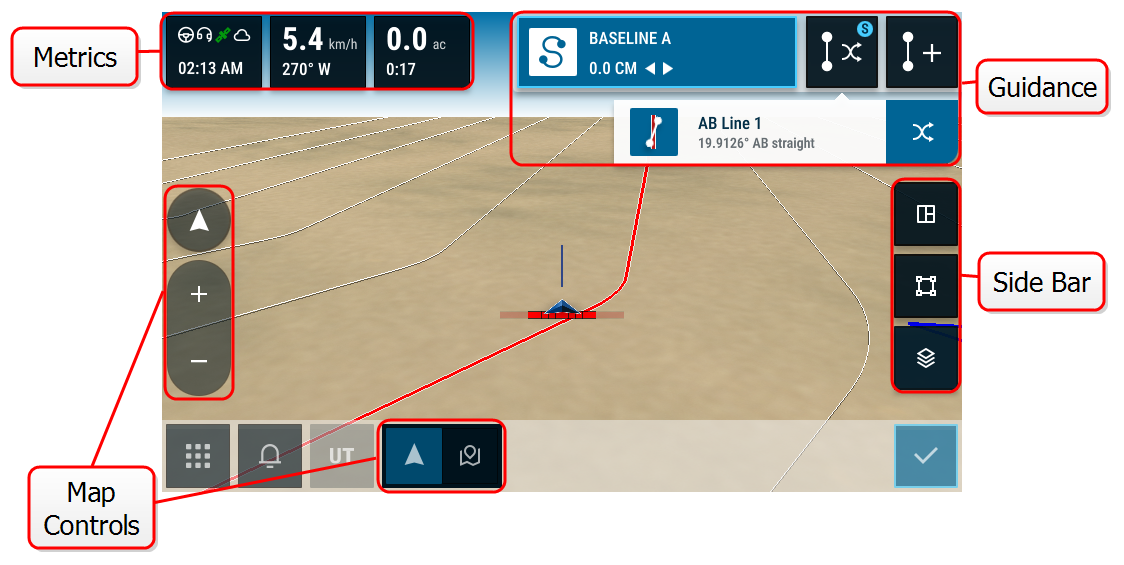
The image below is an example of a CRX+ Run screen. This section provides basic information on Run screen layout and widgets.
Run Screen Icons
There are many side bar icons available on the Run screen. The table below shows the widget image as well as a brief description of function. Run screen configuration will vary by device and settings.
Metrics
| Icon | Name | Description |
|---|---|---|
|
|
System Status Box | Displays the current local time and status of steering, remote support, GPS connectivity, and Slingshot® connectivity. Tap the box to access remote support, GPS settings, and Slingshot® settings. |
|
|
Speed & Heading Box | Displays the current machine speed and direction heading. Tap the box to view current altitude. |
|
|
Coverage & Job Time Box | Displays the amount of coverage applied to the current field and the total time spent running in the job. Tap the box to view the distance to the next swath. |
Guidance
| Icon | Name | Description |
|---|---|---|
|
|
AB Contour/Curve |
Indicates that the currently selected line is an AB Contour/Curve. |
|
|
A+ Heading Straight |
Enter a GPS heading. |
|
|
Line Swap | Switch the selected guidance line, and toggle on/off line swap suggestions and EasySwath. |
|
|
AB Straight |
Indicates that the currently selected line is a straight AB guidance line. |
|
|
Guidance Lines |
Start or load a new guidance line. |
|
|
Last Pass |
Create a Last Pass line with this widget. |
|
|
Pivot |
Create an pivot guidance line with this widget. |
|
|
Roundtrip | Create a guidance line based off of the field boundary. Includes the option to set the count of alternative lines that will be generated from the boundary, as well as the offset of the first alternative line. |
Side Bar
| Icon | Name | Description |
|---|---|---|
|
|
Layers | Toggle layers that are generated to display information about direction, velocity, altitude, or product maps of coverage. See Use Layers. |
|
|
Scouting Object |
Provides information on existing scouting features and creating scout features. See CRX+ Scouting Objects. |
|
|
Widget Menu |
Select or remove widgets displayed on the run screen or edit the widget layout. |
Map Control
| Icon | Name | Description |
|---|---|---|
|
|
Zoom In |
Zoom into the Run screen map. |
|
|
Zoom Out |
Zoom out on the Run screen map. |
|
|
3D Toggle |
Toggle to the 3D down-field view of the Run screen during active field operations. |
|
|
2D Toggle |
Toggle to the 2D over-head view of the Run screen during active field operations. |
|
|
Center to Vehicle |
Adjust the map so the vehicle is in the center. |
Widgets
CRX+ offers additional tools, in the form of widgets, that may be placed on the run screen. Refer to the following table for a brief overview of the widgets available for use during in-field operations.
| Widget | Name | Function |
|---|---|---|
|
|
Add Point of Interest |
Provides the option to place a marker flag on the CRX+ run screen. |
|
|
Altimeter |
Displays the machine elevation. |
|
|
Analog Video |
Allows for view of multiple analog cameras for real-time vision while in a job. See Use Analog Video. Note: This feature is not available on CR7®+. |

|
Auto Turn | Enables automatic headland turning, allowing the machine to automatically turn itself to the next determined swath when approaching boundaries. See Auto Turn. |
|
|
Crop Registration |
Displays information of the current product and allows the user to switch between other products. |
|
|
Day/Night Switch |
Changes the color scheme of the display. |

|
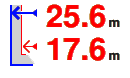
Distance to Border | Displays the distance from the front of the machine to the nearest boundary (on top) and the distance to the nearest headland (on bottom). Select and hold the widget on the run screen to choose to display the distance to border, distance to headland, or both. |
|
|
Guidance Width Status |
Displays the actual guidance width. |
|
|
ISO Generic |
Provides generic information from a connected ISO device. |
|
|
Displays the ISO Universal Terminal (UT |
|
|
|
Job Info |
Displays information about the current job such as boundary area, unapplied boundary area, and unapplied non-headland area. |
|
|
Last Pass Refresh |
Refreshes the last pass line when an updated is needed. |

|
Layer Value Legend | Displays information about the currently selected layer. See Use Layers. |
|
|
Master Switch |
Indicates if the master switch is on (green) or off (red). See Configure Master Switch. |
|
|
Object Pool |
Switches between ISO UT |
|
|
Product Assignment |
Assigns a different product to the selected coverage. |
|
|
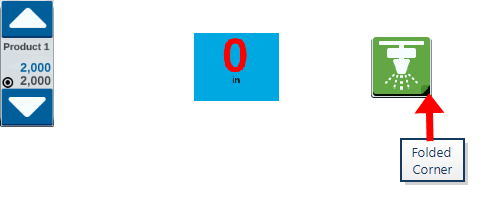
Product Rate |
Adjusts the product rate. |
|
|
Product Select |
Selects different products. |
|
|
Section Status |
Selects the best option for displaying configured sections. Available at various widths. |
|
|
Seed Plot |
Displays additional information about the current and upcoming seed plot. |
|
|
Steering Status |
Steering is engaged. |
|
|
Implement Disk Angle |
Displays actual position of the discs/wheels. |
|
|
Implement |
Displays actual position of the side-shift cylinder. |
|
|
Swath Number Status |
Shows the swath number. Depending on configuration, it will display either relative or absolute. |
|
|
Switchbox |
Provides access to easily turn sections on or off. See Use Switchbox. |


Note: CRX+ supports Windows Mask widget. When an ISO node has Windows Masks, they will appear at the bottom of the widget list.
Add Widgets
To add/change the widgets visible on the Run screen:
- Select the Widget Menu
 button.
 - Select the Add
 button to add a new widget layout, or select the Edit
 button to edit an existing widget layout.
Note: Widget layouts can be saved as custom widget profiles, allowing the user to save different combinations and orientations of widgets for different kinds of jobs or applications.
- Select or deselect the desired widget(s) to display on the Run screen.
Adding a widget will enter the widget Layout Mode. In the Layout Mode, the user may move widgets around as desired to customize the display of information on the run screen.Note: Use the Enable Snapping option to prevent new widgets from covering up previously added widgets on the Run screen.
- Select Accept
 in the lower right corner to return to the Run screen and resume normal in-field operation and application controls.
Widget Options
Several widgets offer additional settings or options accessible on the run screen directly through the widget. Select and hold a widget to display a settings prompt for the specific widget.
Last Revised: Mar 2025