Use Virtual Thumb Drive (VTD)
Virtual Thumb Drive (VTD) is a feature that allows for easy transfer of data between CRX+ field computers. After creating and linking a Microsoft OneDrive account to the CRX+, users can transfer data between VTD without the need of a physical USB drive. Additional computers linked to the same OneDrive account will be able to access all data saved to VTD.
Note: Use of VTD requires a Slingshot® subscription.
Connect OneDrive Account to VTD
Use of the Virtual Thumb Drive requires the creation of a Microsoft OneDrive account. To authenticate and connect a Microsoft OneDrive to VTD:
- On a computer or mobile device, enter https://products.office.com/onedrive/online-cloud-storage into the address bar.
- Select Sign up for free and follow the instructions to create a Microsoft OneDrive account.
- Create a directory titled “vtd” on the OneDrive account.
Note: Ensure that “vtd” is all in lowercase on the OneDrive account.
- Connect the field computer to the internet.
- Select Settings
 on the bottom left of the Home screen. The Settings Menu will open.
 - Select the Slingshot®
 button on the Settings menu to navigate to the Slingshot® Field Hub screen.
 - Select VTD on the sidebar to navigate to the VTD authorization screen.
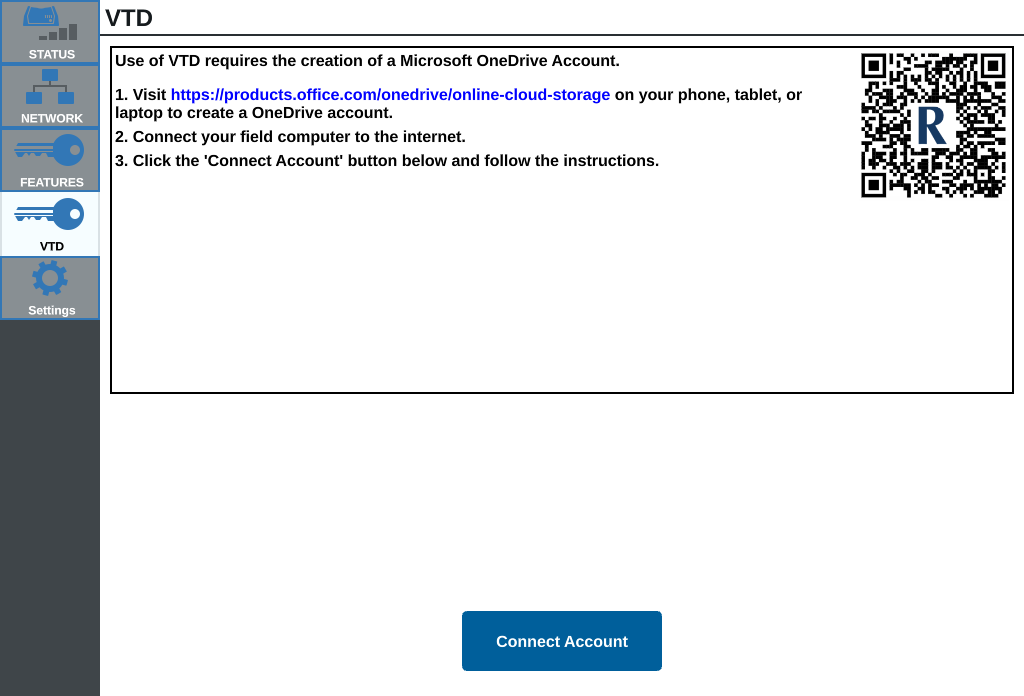
- Select Connect Account on the prompted page.
- On a computer or mobile device, enter https://microsoft.com/devicelogin into the address bar.
- Once on the web page on the computer or mobile device, enter the access code prompted on the CRX+ screen.
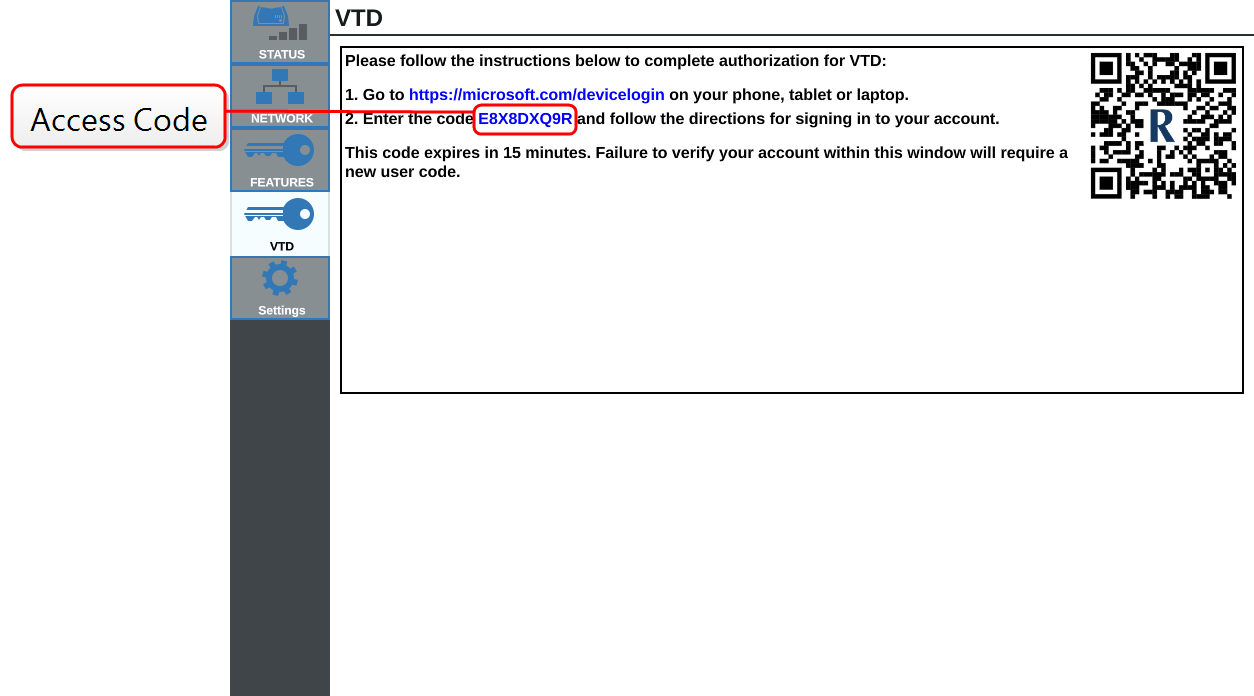
Note: The access code will not be the same code as shown above.
- Once the account is linked with VTD, the screen shown in below will display.
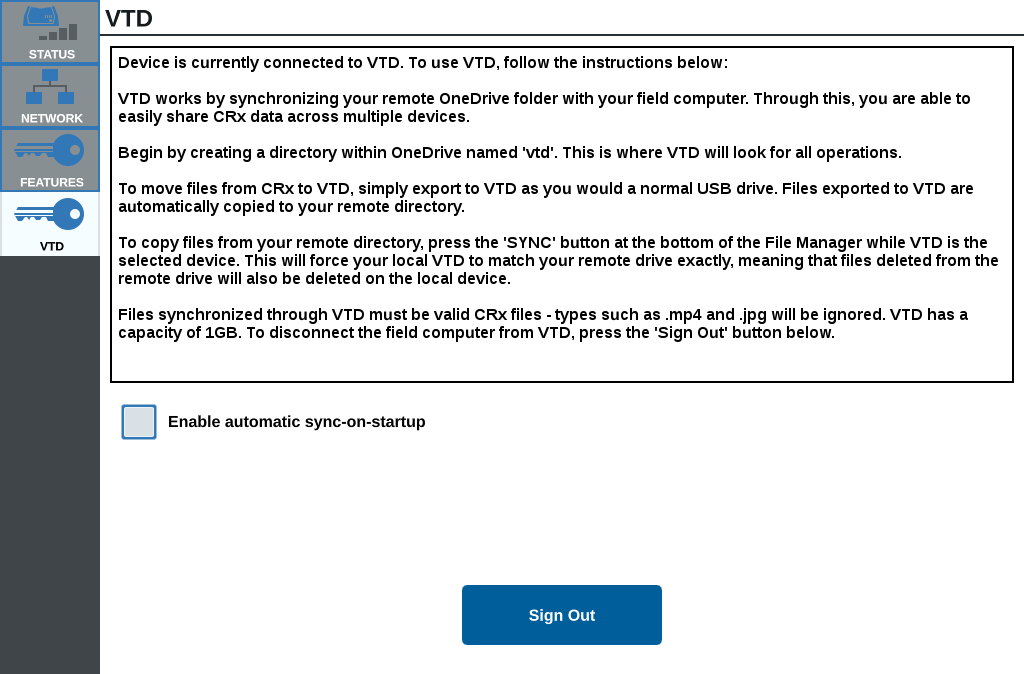
Note: The folder structure of the VTD should be the same structure as USB. See File Types for more information about folder structure of USB.
Operate VTD
VTD will utilize a remote VTD hosted in the OneDrive account, and a local VTD located directly in the CRX+ software. Local and remote VTD files synchronize, sending local files to the remote drive, and remote files to the local drive. Files locally stored on the CRX+ device but not in the local VTD folder will be stored in “local file storage.”
Note: Files must be transfered from VTD to local file storage for usage.
To transfer a file stored locally on the CRX+ to VTD:
- Select Settings on the bottom left of the Home screen. The Settings Menu will open.
- Select File Manager
 on the Settings menu. The File Management window will open.
 - Select Local from the source drop-down.
- Select the checkbox for desired file(s) or All Files checkbox to select all of the files on the CRX+ or sort files by GFF
 Grower, Farm, Field.
 - Select Copy
 to copy the selected file. The Copy Files window will open.
 - Select the VTD and select Accept
 to copy the file or Cancel
 to stop copying the file.
 - Select Accept
 after selecting the desired file(s).
To transfer a file stored remotely on VTD to CRX+:
- On the OneDrive account, place the desired file into the vtd folder.
- Select Settings on the bottom left of the Home screen. The Settings Menu will open.
- Select File Manager on the Settings menu. The File Management window will open.
- Select VTD from the source drop-down.
- Select Sync
 to send files from the OneDrive vtd folder to local VTD folder on the CRX+.
Note: After the VTD sync completes, import the files to CRX+ with the same process as a physical USB drive to use the transfered files.
- Select the checkbox for desired file(s) or All Files checkbox to select all of the files on the VTD or sort files by GFF Grower, Farm, Field.
- Select the desired file(s) to be copied.
- Select Copy to copy the selected file. The Copy Files window will open.
- Select Accept to begin the copy operation or Cancel to stop the copy operation.
Note: To delete a file in the local VTD folder in the CRX+ device, the file must first be deleted in the OneDrive vtd folder. Then resynchronize on the CRX+ device to remove the deleted file from the local VTD folder.
- Select Accept to save the displayed settings and return to the Settings menu.
Last Revised: Mar 2025