Initial Setup
When starting the system for the first time, a setup wizard will walk you through a setup process.
Note: Check all measurements before entering values into the field computer and enter all measurements as accurately as possible. Check that values entered on the field computer are consistent with measurements.
After powering up the system for the first time:
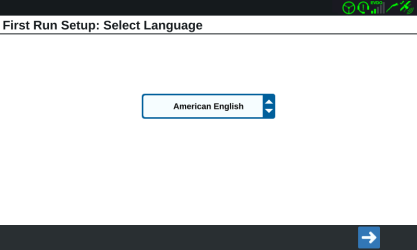
- Select the desired language from the drop-down on the First Run Setup: Select Language page.
Note: Screen layout and button/widget location may vary slightly from the images shown in this manual.
- Select Next
 . The First Run Setup: Select Time Zone page will be displayed.
Note: Select Previous
 at any time to return to the previous page.
 - Select the desired time zone from the drop-down.
Note: Time zones are based on an offset from Coordinated Universal Time (UTC). Ex. Los Angeles is UTC-08:00, New York is UTC-05:00, Berlin is UTC+01:00, and Moscow is UTC+03:00. It may be necessary to add an extra hour for daylight savings time for some regions.
- Select Next
 . The First Run Setup: Select Units page will be displayed.
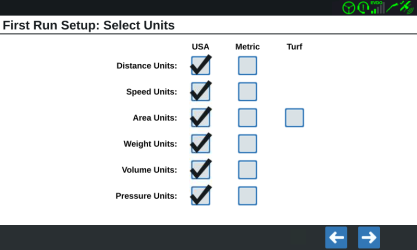
 - Select the desired units (US Standard, Metric, or Turf) for each of the measurement types (Distance, Speed, Area, Weight, Volume, Pressure, and Temperature).
- Select Next
 . The First Run Setup: Simplified User Interface page will open.
 - CR7™ offers a Simplified User Interface option which provides a basic set of guidance focused features and options.
Do not enable this feature if the field computer will be used to control product application or planting operations, if detailed application maps and reports will be needed for multiple operations, if it will be connected to an ISO or CANbus system, or detailed file maintenance is necessary for field operation reporting. - Select Next
 . The First Run Setup: Grower/Farm page will display.
 - Enter the desired grower name in the Name the Default Grower field.
- Select Next
 . The First Run Setup: Configure Machine Configuration page will be displayed.
Note: A Machine Configuration allows the user to select the type of equipment used for various field operations (e.g. tractor and implement, self-propelled sprayer, etc.) and quickly switch between configurations when using the CRX system with various machines or types of towed implements.
- Select the Quick Start button to set up a basic machine configuration or the Create Detailed Machine Configuration button to set up a more detailed machine configuration such as a tractor with a towed implement.
Note: The Quick Start option provides simple set up to complete the initial configuration and begin using the CRX system. The Detailed option allows the user to enter detailed machine and implement measurements for optimized guidance for specific equipment types (e.g. self-propelled sprayer versus towed planter behind an articulated tractor) and additional guidance features. Both configuration options may be edited later as needed.
For more information on the Quick Start Option, see Quick Start Machine Configuration. For more information on the Detailed option, see Configure a New Machine.
Note: The CR12™ startup wizard will ask for the cable harness type used with the field computer. The default option is 115-8000-064 and should only be used if the part number of the cable harness connected to the CRX field computer matches. If using a different cable, select Other from the drop-down. If needed, the cable selection can be edited later in the GPS Information tab.
After powering up the system for the first time:
- Select the desired language from the drop-down on the First Run Setup: Select Language page.
Note: Screen layout and button/widget location may vary slightly from the images shown in this manual.
- Select Next
 . The First Run Setup: Select Time Zone page will be displayed.
Note: Select Previous
 at any time to return to the previous page.
 - Select the desired time zone from the drop-down.
Note: Time zones are based on an offset from Coordinated Universal Time (UTC). Ex. Los Angeles is UTC-08:00, New York is UTC-05:00, Berlin is UTC+01:00, and Moscow is UTC+03:00. It may be necessary to add an extra hour for daylight savings time for some regions.
- Select Next
 . The First Run Setup: Select Units page will be displayed.
 - Select the desired units (US Standard, Metric, or Turf) for each of the measurement types (Distance, Speed, Area, Weight, Volume, Pressure, and Temperature).
- Select Next
 . The First Run Setup: Grower/Farm page will display.
 - Enter the desired grower name in the Name the Default Grower field.
- Select Next
 . The First Run Setup: Configure Machine Configuration page will be displayed.
Note: A Machine Configuration allows the user to select the type of equipment used for various field operations (e.g. tractor and implement, self-propelled sprayer, etc.) and quickly switch between configurations when using the CRX system with various machines or types of towed implements.
- Select the Quick Start button to set up a basic machine configuration or the Create Detailed Machine Configuration button to set up a more detailed machine configuration such as a tractor with a towed implement.
Note: The Quick Start option provides simple set up to complete the initial configuration and begin using the CRX system. The Detailed option allows the user to enter detailed machine and implement measurements for optimized guidance for specific equipment types (e.g. self-propelled sprayer versus towed planter behind an articulated tractor) and additional guidance features. Both configuration options may be edited later as needed.
For more information on the Quick Start Option, see Quick Start Machine Configuration. For more information on the Detailed option, see Configure a New Machine.
When powered on for the first time, the ROS device will prompt the operator to configure the machine before proceeding. The following procedure is designed to assist the user or equipment owner with the initial set up and configuration of the ROS device and is recommended to avoiding entering profile calibration information more than once.
Please read the following procedure from start to finish before starting the initial setup. Completing the tasks in the order presented in the following section will help ensure the ROS device and connected systems are ready for operation in the shortest time possible.
Language and Units
-
Power on the ROS device and complete the configuration prompt. See Power Button and Status Indicator for details on powering the device.
-
Select the Done
 icon to clear the initial machine configuration prompt.
 - Select the Administrator Panel
 icon in the top left corner of the display.
 -
Select the Location Information
 tab and set the desired language at the bottom of the tab display.
 -
If desired, update the time zone to the local universal coordinated time (UTC).
-
Select the unit preferences tab and select the desired base and pressure units for display. These units will be used to enter the machine configuration and calibrate control systems.
Note: See Manage User Profiles for additional details on setting up user profiles on the ROS device.
-
Proceed to the Initial Machine Configuration page to continue the initial set up of the ROS device.
Last Revised: Jul 2024

