AutoTurn Configuration
Note: AutoTurn is an unlocked feature. For information on unlocking features, refer to Feature Unlocks Overview.
The AutoTurn feature enables automatic headland turning, allowing the machine to automatically turn itself to the next determined swath when approaching boundaries.
![]()
![]()
Configure AutoTurn
To configure the Auto Turn feature in CRX:
-
Select Settings
 on the bottom left of the Home screen. The Settings Menu will open.
 -
Select Auto Turn
 on the settings menu. The Auto Turn Settings window will open.
Note: The Auto Turn Settings window can also be accessed in a job by pressing and holding the Auto Turn Widget
 on the run screen.
 -
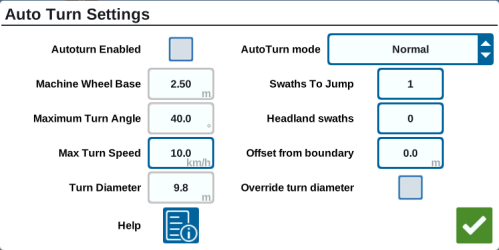
Configure the available settings to the operator's preference:
Autoturn Enabled
Select this option to enable the Auto Turn feature. The Auto Turn widget will extend to include directional arrows on the run screen.
Note: Refer to Edit Widget View for more information on widgets on the run screen.
Machine Wheel Base
Input the distance between the front and rear axles of the machine.
Note: This option cannot be edited if an RS1™ is connected to the CRX device. This value can be changed in the RS1™ configuration.
Maximum Turn Angle
Input the maximum angle the wheels are allowed to turn.
Note: This option cannot be edited if an RS1™ is connected to the CRX device. This value can be changed in the RS1™ configuration.
Max Turn Speed
Input the maximum speed the tractor is allowed to drive when turning automatically.
Note: A higher maximum speed will also cause a larger diameter of the turn.
Turn Diameter
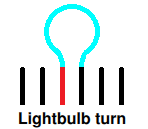
This option is not typically set by the operator. This will display the calculated turn diameter that was determined by the wheel base, max turn angle, and maximum speed. If the distance between swaths is less than the turn diameter, a "lightbulb" turn will commence. The calculated value is the minimum value allowed. Select the Override turn diameter checkbox to allow the Turn Diameter to be overridden with a larger value.
Override turn diameter
Select this checkbox to allow the Turn Diameter to be overridden with a larger value.
AutoTurn mode
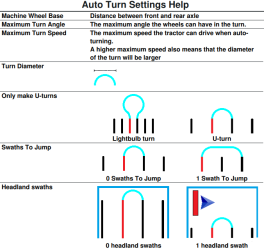
Use this drop-down to select Normal mode to allow for "lightbulb" turns, or select U-turn mode to only allow u-turns.
Swaths to Jump
Input the number of swaths desired to be skipped at each turn. If set to 0, Auto Turn will not skip any swaths.
Headland swaths
Input the number of desired headland passes at the top of the field. When set to 1, the turn will be made in such a way that the implement will not enter this area.
Note: For example, if the implement is 10 meters, then the Auto Turn line will be at 15 meters from the boundary (1 headland pass plus half implement width). This can be increased or decreased using the offset from boundary.
Offset from boundary
Input the desired offset to add to the total distance from boundary. The default distance from the boundary will be determined by the number of swaths multiplied by the width of the implement and added to half of the width of the implement. Set the offset from boundary to add to this distance.
Help
Select this option to view descriptions and visual representations of several available options.
AutoTurn Requirements
In order for AutoTurn to function correctly, ensure:
-
The current job has a defined field boundary.
Note: Refer to Scouting Features for more information on field boundaries.
-
GPS is enabled and functioning.
-
Guidance width is set up and accurate.
AutoTurn is currently compatible with:
-
Straight AB
-
Fixed Contour
-
AB-Heading
Note: Refer to Guidance Lines and Patterns Description for more information on these kinds of guidance patterns.
The Turn Radius feature must be checked and verified as accurate before operation to ensure no harm is inflicted on any machine or equipment.
Configure AutoTurn
To configure the AutoTurn feature:
-
Select and hold on the middle portion of the AutoTurn Widget
 .
.Note: Refer to Operate the AutoTurn Widget for additional information on operating the widget.
-
The AutoTurn Settings page will open. The following options are available:
Headland Swaths
-
This value determines the number of swaths that will be used on the headlands.
-
AutoTurn will assume that the operator wants to reduce crop run-over and target the most inner swath for the turn.
-
Utilizing more than one swath reduces the chance of a boom tip exceeding the boundary or hitting a fence line.
Skip Swath
-
This value shows the number of swaths that will be skipped when driving down the headland.
-
A value of “0” indicates that the operator will turn back into the field for the very next swath.
-
A value of “1” indicates that the operator will drive past one swath, then turn back into the field, skipping the swath to be filled later (if applicable).
-
Up to four skip swaths may be used.
Field Buffer
-
This value allows the user to add an additional buffer zone away from the boundary so that the boom tips do no approach the fence line.
Turn Speed
-
This value determines the target speed at which the tractor will turn.
-
The faster the target speed, the larger the arc.
-
The slower the target speed, the smaller the arc.
Note: For tractors will pulled instruments, the turn should be fast enough yet narrow enough so the implement does not hit the tractor.
Turn Radius
This value identifies the radius of the tightest turn possible. Turn radius is calculated from the turn speed and the Max G Force setting in the RS1™ advanced turning options.
Note: Turn Radius must be checked and verified before operation to ensure there is no harm done to any machine or equipment.
-
Note: Refer to AutoTurn Widget Operation for additional information on operating the AutoTurn feature with the AutoTurn widget.
Last Revised: Jul 2024


