CRX+ Settings Menu
Overview
Note: The shortcut bar is only available on CR7®+ devices.
The following settings and options are available via the various menu screens. Menu options may appear over multiple screens. Swipe to the left or right to view additional menus.
| Icon | Name | Information |
|---|---|---|
|
|
Add Shortcut |
Add menu options to the Shortcut Bar for quick access to frequently used settings and features. See Customize Shortcuts. |
|
|
Analog Video |
Adjust the settings for the analog camera viewer while not in a job. Only available on CR12®+. See Configure Analog Video. |
| Audio Settings |
Adjust notification volume levels and configure proximity audio signals. See Configure Proximity Audio Signals and Volume Settings. |
|
| Auto Turn | Enables automatic headland turning, allowing the machine to automatically turn itself to the next determined swath when approaching boundaries. See Auto Turn. | |
|
|
Base Stations |
Create and configure local base stations. |
|
|
Display |
Set display to Day or Night Mode and adjust Screen and Lightbar Brightness. See Adjust Display Settings. |
|
|
File Manager |
Import and export files as well as view and delete files. See CRX+ File Manager Overview. |
|
|
GFF |
Create, rename, or delete Growers, Farms, or Fields. See Manage Grower, Farm, Field (GFF). |
|
|
GPS |
Review GPS information, diagnostics, and adjust settings. See View GPS Information. |
|
|
ISOBUS |
View information on ISO Universal Terminal (UT |
| Job Settings |
Allows configuration of globally applied in-job settings, such as: If this option is selected, only tram lines will be shown if an implement wider than two times the swath width is mounted in the machine garage. Note: This is only relevant to jobs with operation planning. If this option is selected, a pop-up will appear when reentering a job and offer the option to clear previous coverage. Set this option for moving the reverence point for selecting the guidance lines in the forward direction. |
|
|
|
Lightbar |
Adjust settings for Path Deviation Sensitivity, Center settings, and Reverse LED Indication. See Configure Lightbar. |
|
|
Localization |
Adjust settings for Language, Time Zone, and Units of Measure. See Adjust Localization Settings (Language, Time Zone, Units). |
|
|
Networking |
Create and configure Wi-Fi and other network connections. See Configure Wi-Fi. |
|
|
Machine |
Add a new machine or update the existing machine configuration. See Configure Machine. |
|
|
Master Switch |
Select options that can be used as the input for master switch status of connected nodes. If no other options are selected, select the On-Screen option to record coverage. See Configure Master Switch. |
|
|
Product Manager |
Manage the products applied to the field. These can be tank mixes, liquid or granular products, or plant varieties. See Product Manager. |
|
|
Rate Control |
Adjust prescription map |
|
|
Remote Support |
Select this page if working with technical support and they request access to the CRX+ via Slingshot®. See Activate Remote Support. |
|
|
Section Control |
Adjust individual settings including the On Override, Turn Off Percentage, and Look Ahead settings for section control. See Adjust Section Control. |
|
|
Serial Port |
View information on the serial connection speed and the type of serial device. See View Serial Port Information. |
|
|
Slingshot® |
Slingshot® is a subscription based service that allows the user to transfer files remotely. Slingshot® also allows the service desk to perform remote service on the system. |
|
|
Software Update |
Install available software updates using either Slingshot® Link or a USB drive. GPS and CRX+ unlock status and system information can also be found on this page. See Update Software and Hardware and Feature Unlocks. |
|
|
Weather Station |
Provides support for add on components that measure temperature, humidity, etc. The information from the weather station can be recorded along with other job information. |
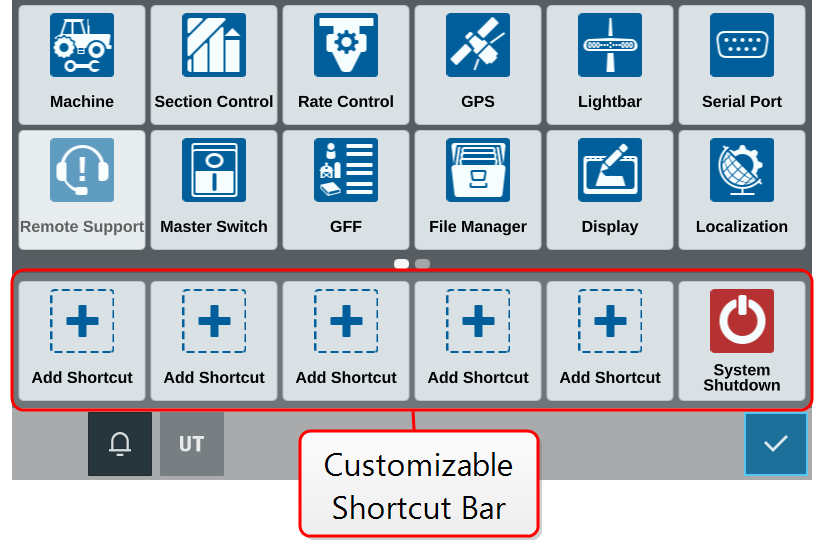
Customize Shortcuts
Note: The shortcut bar is only available on CR7®+ devices.
Add Shortcuts
To add a widget to the Shortcut Bar:
- Select Add Shortcut
 in the Customizable Shortcut Bar.
 - Select the desired setting icon.
Remove or Change Shortcuts
To remove or change an icon in the Customizable Shortcut Bar:
- Select and hold the desired icon for 2 seconds. An X will be displayed in the upper left corner of the selected menu item.
- Select the X to remove the icon or select a different icon from the Settings menu options.
Last Revised: Mar 2025